It’s pretty easy to get started in ProductPlan. As you begin, you’ll want to understand and define the different elements of your roadmap. Below are our suggestions for getting off to the best start!
As a quick reminder, start with the Strategy module before moving onto the roadmap. You'll want to have your Objectives and Key Results established before beginning your roadmapping journey.
Set Your Default Roadmap Layout
The roadmap layout is flexible, and offers different levels of granularity. You can start by choosing a default roadmap layout of Timeline or List.

The Timeline Layout is a great format for communicating progress of initiatives, especially when viewing start dates are important. The List Layout gives you additional flexibility by giving you the option to align your initiatives based on end date (when selecting Quarters, Sprints or Months) or customize columns using Tags. Selecting one of these two layouts will determine your default view, but you can adjust this at any time.
When selecting a time-based layout, it can be a challenge to strike the right balance between long-term vision and short-term execution in your roadmap. We recommend starting with a high level timeline like Months or Quarters - but it's often helpful to have a more granular view.
Luckily, you can create custom views to save alternate timelines for your roadmap, like Sprint or Weekly views, which can be shared with different audiences.
Organize Your Roadmap
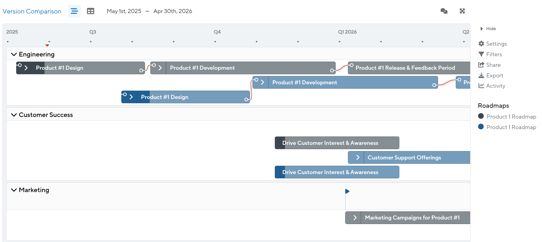
ProductPlan has a built in hierarchy of information (Roadmap > Lanes > Containers > Bars). Organizing your roadmap with each of these levels will help you plan better and communicate more effectively. The Portfolio View is at the top of the hierarchy. This is a way to combine multiple roadmaps together into a singular, holistic view. Standardization (particularly Legend) is essential for an effective Portfolio.

The roadmap hierarchy provides flexibility for helping you determine how detailed to make your roadmap. As you begin building, consider the following questions to help you establish different levels of granularity:
-
Who is the intended audience for your roadmap?
-
How are your strategic goals represented?
-
What is your roadmap's elevator pitch?
-
How far out will you be planning?
Keep these questions in mind as you begin defining the different elements of your roadmap.
Use Lanes to Organize Your Roadmap
Lanes should represent high level categories. Use Lanes to organize your roadmap by different groups like teams, products/sub-products or strategic goals:

Use Containers to Group Initiatives
Containers allow you to group related bars together. Use Containers to organize your content by high level themes, releases, epics or long term projects:

Use Bars to Plan Initiatives
Bars are your specific initiatives. Use them to represent stories, projects, tasks, or any other initiatives or deliverables:

How to use Your Legend
The Legend should help answer the question -- what are you communicating? You can use the Legend to represent Strategic Goals. Other popular Legend categories include Status, Priority or Phases. Whichever you decide, the important thing is that the Legend helps you visually communicate important roadmap details. Keeping your intended audience in mind will help you decide on the most effective Legend.

Account admins have the ability to create a shared legend. This is a centrally managed legend that editors can apply to roadmaps across your organization. Ensure your legends are consistent and your team adheres to legend best practices. Ultimately, the shared legend lends itself to clean, consistent, and easy to read roadmaps/portfolio views.
An added benefit of utilizing the Legend is the ability to filter your roadmap. Filtering allows you to customize the view of your roadmap based on different Legend options. You're able to filter your roadmap based on Legend, Lanes, Tags and/or Custom Dropdown Fields.
Differentiating Between Bars and Containers
You can use both bars and containers to represent different projects or initiatives. The difference is that containers can expand, allowing you to group bars within them.
Using containers is a great way to organize your roadmap, and there are a variety of ways our customers are using them today. Popular examples include:
-
Releases
-
Themes
-
Grouping Dependencies
-
Detailed projects
-
And more...
Custom Dropdown Fields
Custom Dropdown Fields give your team more options for standardization across the platform. This feature will provide you and your team more options to standardize and help control how your roadmap data is organized.
Custom dropdown fields allow you to expand the types of data added to your roadmap while supporting an additional layer of filtering. This feature is meant to build confidence in the roadmap as a reliable and easy to use source of information. Single-select or multi-select dropdown fields can be created and added to the roadmap.

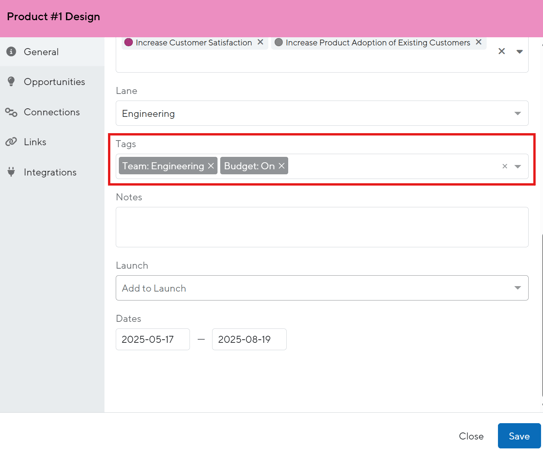
Define Tags to Create Custom Views
In can be a challenge to get the right level of information for the right audience. Utilizing Tags will help you customize your roadmap view based on the information you need to present.
Tags are customizable and there are a variety of ways that you can use them. Some examples of how we’ve seen our customers use Tags include:
-
Product Owners
-
Geographic Locations
-
Teams
-
Release Dates
-
Dependencies
-
Status
-
Vertical Markets
-
Strategic Goals
Once you’ve added Tags, you can Filter the roadmap by those Tags to create specific views for different audiences. If your team standardizes Tags across roadmaps, they'll be consolidated at the Portfolio View level.
Our best practice is to start your Tags with a common theme followed by a dash or colon. All the theme subsets will follow the dash or colon. An example would be Priority Status: High or Team Member-Zach.
You can create and save multiple views of a single roadmap. Create custom views to share with different audiences. You can present views in live meetings, share direct links to saved views, or export them for interested stakeholders.
Account Admins are able to create shared tags within Account Settings, under the Standardize section, on the Tags page.
Pivot the layout of your Roadmap with List View
When creating a custom view, you can change the layout of your roadmap. You’ll be able to choose between the default Timeline view or a Kanban style called List View:

Use List View to organize your initiatives into columns by completion date. Organize your columns by Quarters, Months, Sprints, Tags, Objectives, or custom fields by making the selection within the Style field.


When a bar is placed in a column based on its Tag, it'll default to alphabetical order. As an Editor, you'll have the ability to customize the order of your bars.
Simply click the desired bar you want to move and drag it to a new position with the same column or an entirely different column. If a bar is placed into a new column, the Tag will automatically be updated for that Bar.
View Layout Toggles
Once you've selected your Primary layout view to Timeline or List, you can toggle between the two by selecting the icons in the Header as shown below.
These tooltips, in order left to right are: Timeline, List, Table Layout and Prioritization Board.

This feature is a unique experience for each user who has access to the roadmap. Toggling between view layouts (Timeline or List), will not change the layout for other Editors or Viewers who have access to the roadmap. The default roadmap layout would be determined in the roadmap settings.
How do the Parked Section, Planning Board and Roadmap fit together?
Collectively, these three components will help you plan, build and communicate your strategy. The Roadmap, Parked Section, and Planning Board are flexible, so you aren’t forced into a rigid workflow and you can get started in any order. Learn how to move information from your backlog to planned and create the best roadmap flow for your team here.
Combine Multiple Roadmaps in a Portfolio View
Often, it’s easier to organize your plans if you break them up into multiple roadmaps. When you need a consolidated view, you can merge any combination of roadmaps into a Portfolio View.
If you’re building a variety of different products, try dedicating one roadmap to each. Having your products separated will keep your roadmaps focused on the details and help your team more clearly communicate each product’s direction. Then create a Portfolio View to combine your products in a single portfolio view.
Another common use of Portfolio Views is to combine roadmaps from multiple Product Managers. If each PM has his or her own roadmap, you can use the Portfolio View functionality to combine them into one consolidated view. Since you can build unlimited Roadmaps and Portfolio Views, you’re able to create as many combinations as you need for different audiences or situations.
Another popular use case of the Portfolio Views is related to Versions. Create a version of your roadmap at the beginning and end of a quarter (or desired timeframe). Combine these together with one color per roadmap and combine lanes by title.